In part 1, Sam explained when to use an asynchronous client and how to set one up. In this follow up, he will explore how to manage and use the Document API effectively including the handling of redirects and file downloads.
The Document API
In part 1, we demonstrated how to utilise asynchronous approaches to HTTP requests, but now let’s get back on to the real aim of this series – using the Document API on Companies House.
Before we continue, let’s review the documentation on the Document API. From this we can see that we need to obtain a document_id and pass this into the URL of the request. Once this is done, we will obtain a redirect link to the actual location of where the document is stored. It is also worth noting from the above that we can pass in an Accept header to determine the specific file type we want if they exist – per the documentation this can be obtained on the GET Document Metadata endpoint.
So based on the above, one approach to obtain a single file would be to build a pipeline similar to:
- Obtain the filing history for the relevant company – we can filter based on category and dates say for example if we are interested in confirmation statements filed during an accounting period.
- Use the file’s link.document_metadata as noted in the filingHistoryList model to get the direct link to that document’s metadata.
- Pull out a preferred file type from the resources key as defined on the documentMetadata model.
- Obtain the document location using our preferred file type passed in as the Accept header – note that from the documentation the URL for this endpoint is the same as that in part 2 above, but with /content appended to the string.
- Download the file from the resulting URL obtained in part 4.
Quite a few steps involved, but fortunately we can easily automate all these steps.
Adding our relevant methods


Now the first method we will add is the get_filing_history method, and given the use case mentioned above, I want to introduce an ability to filter the response on category of document and within a certain time range, so I will include these as arguments and then filter the returned data accordingly:
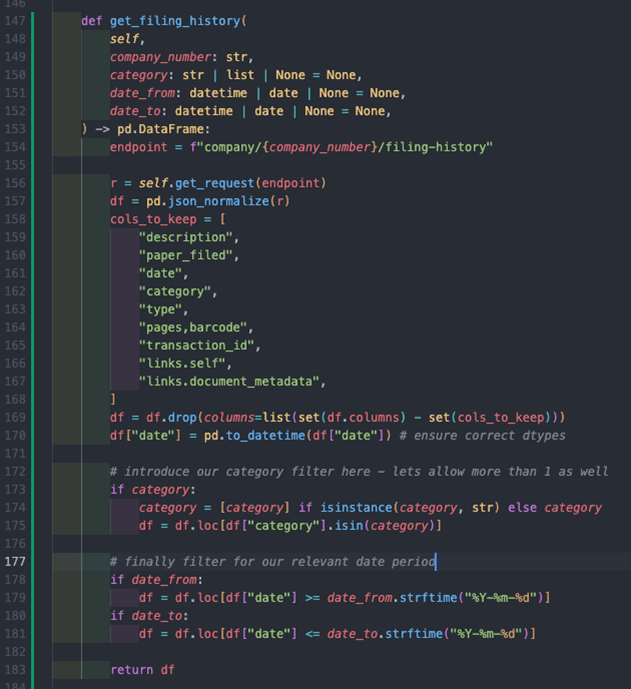
None of the above should be hugely complex, with the bulk of the code acting as follows:
- Line 154 – 156: define the endpoint and make a request for the filing history for the company number we are interested in.
- Line 157 – 169: this flattens our JSON response and turns it into a pandas DataFrame and removes unwanted columns.
- Line 170: ensures our date column is typed correctly to allow filtering.
- Line 173 – 175: filters the response for documents of the category or categories we are interested in.
- Line 178 – 181: filters for the relevant date period we are interested in, note how we accept datetime and date objects and then convert them to a specified string format to allow pandas filtering to take place.
Now we can begin to look at steps 2 onwards from above, so firstly let’s build a top-level method for handling document requests to the 2 available endpoints. I have built this to accept either an endpoint address or full URL – reasons for this can be seen when reviewing the output of the get_filing_history method.
However, before I move on, it is worth explaining to you an obvious difference you will notice in the Authentication of the document requests in my code. Whilst not in the documentation, the header needs to be altered and the API key also needs to be base64 encoded before being passed into the request – a thread on their forum covers this in detail.
To encode the API key, we can use Python’s base64 module, but our API key must be presented as bytes first. Fortunately, we can use Python’s encode string method to do this and it is actually simpler than it sounds to implement!
The result of this is a new document_request method that will handle both metadata and content queries based on the URL:
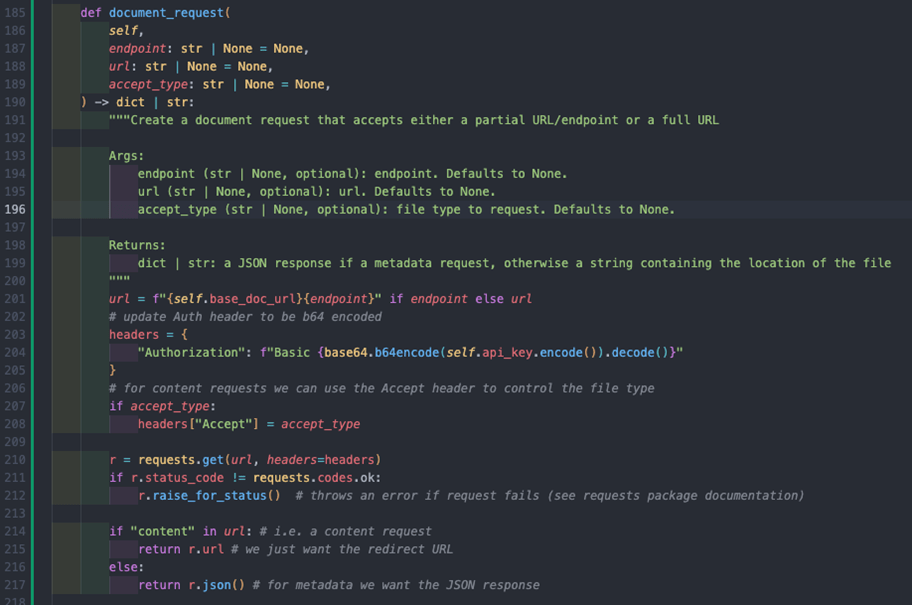
For obtaining the metadata on a document, all we need to do is either pass in the document_id as the endpoint or the URL from the get_filing_history method as the url parameter and the response JSON should look something like this:

Firstly, let’s explore a method for determining the preferred file type from the metadata:
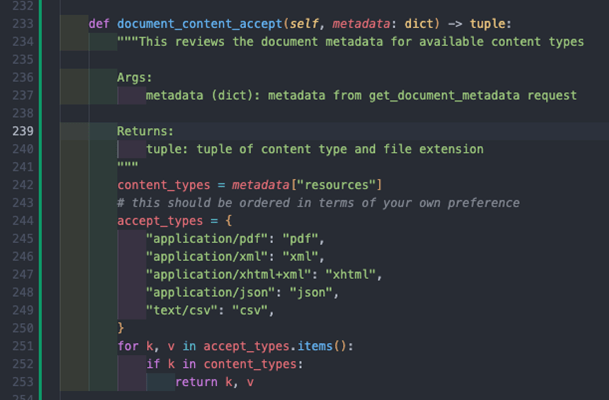
This method takes the metadata returned from our get_document_metadata method and does the following:
- Assigns the available content_types from the resources key in the metadata as defined by the response model.
- Accept_types lists all available content types in our preferred order, in this example we have used PDF as our first one, but XML or XHTML may be preferred as it is structured, and a document parser could be built on top.
- We then iterate through our prioritised list of content types, and then when we hit our first match, we return a tuple with both the content type to be passed into the Accept parameter of our document content request, and the relevant file extension to use when downloading the document.
To then obtain the location of the document, we can use the content type from the document_content_accept method, combined with the content link from the metadata to then grab the URL. An example method implementation of this would be:
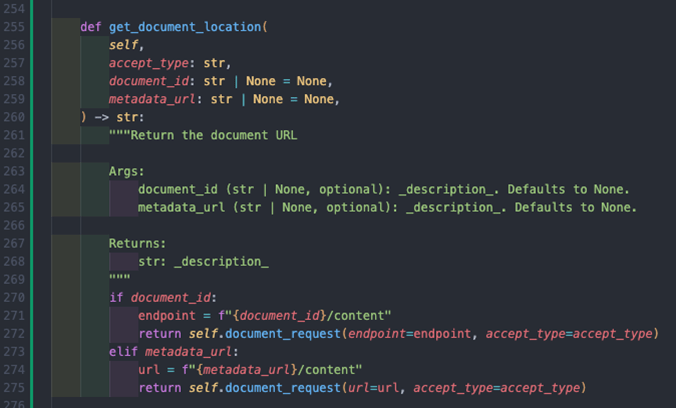
By default, request content is downloaded immediately, but we can use requests stream argument to iterate through the content allowing for us to write the file in a memory efficient manner.
Adapting this to the information we have, we can then create an efficient document retrieval method like this:
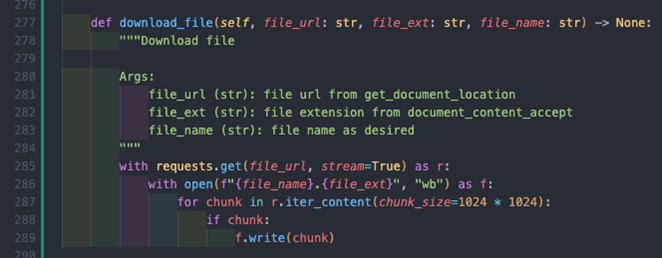
This method uses the URL from the get_document_location along with the file extension and a file name to perform the following:
- Line 285: allows us to use the stream functionality of requests.
- Line 285 – 289: writes data to the file by reading in 1MB chunks of the response at a time, ensuring efficient use of memory.
You will see the with expression used frequently here. This can be used with context managers and ensures in the above that both the requests session we use and the file we use are closed after receiving and writing the data accordingly.
This method of course can be customised to save the file anywhere you wish.
Congratulations, we have now all the necessary components to build a pipeline that can retrieve documents for a specific company of a specific type over a specific period, albeit currently in a synchronous fashion, which as we know from part 1 of this series, may not be the most performant.
Building the pipeline
We are going to use the 5-step pipeline defined earlier on to build out a set of functions that will combine to create a pipeline to automatically download document filings for us. This should be a relatively non-complex exercise so I will not detail the individual steps here but will instead share an example pipeline generator below (the full code is also available for perusal on the repo, but I encourage you to build the pipeline yourself).
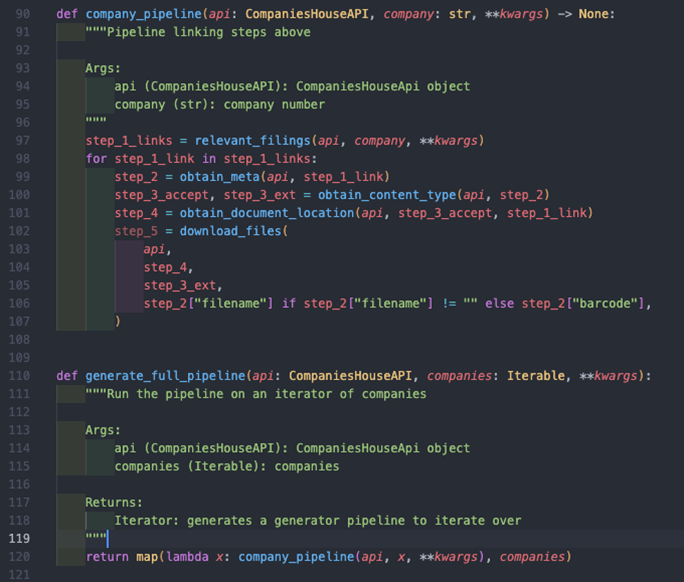
The company_pipeline function is essentially our individual processor function for a single company, and the generate_full_pipeline is our pipeline generator function:
- Lines 97 – 107: this is the order of the pipeline as defined earlier. Firstly, we obtain our filings, of which there could be multiple, and then for each filing we obtain its metadata, then the content type, then it’s location and then we finally download the file. You’ll see that in the download_files function we try to determine the filename from the metadata in step 2, and fallback to the barcode if not – you could of course use your own naming convention.
- Line 120: this utilises the map function to execute the company_pipeline for each company in our companies iterable, i.e. an array or list. The lambda function allows us to specify multiple arguments within the map function, where x denotes a single company within companies, the iterable.
It’s worth noting how we initialise the CompaniesHouseApi object outside of this function and share it with the pipeline. Also, we have allowed keyword arguments to be passed in to allow for filtering on the get_filing_history method we built earlier.
Now it is a simple case of running the pipeline across the companies we are interested in and for the period we want. For example, I run this 10 times on the same company for account filings since April 2014 like so:

For reference, the above took between 20 and 30 seconds to run on my machine, and I think from earlier on in this article, there is likely room for improvement using an asynchronous approach.
Next steps
I hope you found this series a practical example of how you can:
- Utilise asynchronous programming to generate huge efficiency gains in I/O bound tasks such as HTTP requests.
- Utilise the asyncio and aiohttp packages in order to do this in Python.
- Leverage the Document API in Companies House to extract documents in the file formats you prefer.
- Build a generator pipeline to elegantly automate this across a group of different entities and different conditions.
There are several ways to build upon and improve this code, for example:
- Better exception management within the CompaniesHouseApi class.
- Building a document parser to extract relevant information, e.g. parsing PDFs using OCR, or building an XML parser for digital filings in XML/XHTML format.
- Creation of a parent API class to manage HTTP requests better – this could be inherited by child classes and further isolate reused code better.
- Creation of an asynchronous client for making HTTP requests and adapting the CompaniesHouseApi class for it.
- Creating an asynchronous pipeline again to enhance performance.
- As things get quicker when using asynchronous approaches, you should be much more aware of rate limiting and how to manage it – a simple google search will lift up some brilliant results and packages you can leverage.
Whilst writing the above lists, I was quite keen to see the performance enhancements that could be achieved with an asynchronous version of the HTTP client and pipeline, so I built one and this can be found on the repo – my method is not necessarily the best approach and it lacks a lot in terms of exception catching, but again it works and hopefully it should be simple enough to follow. I recommend reading up on queues as it will explain some of this as well.
To highlight again the performance gains, comparing the synchronous results and the asynchronous results shows a huge 76% gain on average for the asynchronous approach:

As always, my approach isn’t the only one, but it works for me and is built in a way that I hope can be easily understood.
About the author
He now works at Circit, as a Product Manager for their Verified Transactions, Verified Insights and Verified Analytics modules.
Feel free to reach out to Sam at sam.bonser@circit.io