In this article, Mark Proctor walks through a simple and efficient method for removing blank columns using Power Query.
Changing inputs into the perfect data often involves removing blank columns. If there are only a few blank columns it is straight forward; we select the columns and press [Delete]. However, if there are a lot of blank columns, or if those columns change name, we need something more dynamic that will not cause errors.
In this post, we will look at (what I believe to be) the method with the fastest refresh time, and discover a few other Power Query techniques along the way.
Example data
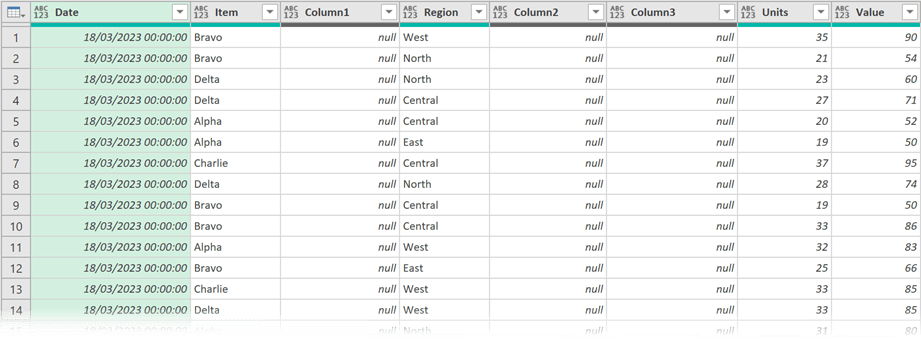
Here is the data we are using in this post.

We have numerous blank columns to remove, and we want to achieve this without including the column names in the M code.
Table.Profile
Power Query has a function called Table.Profile which is not available in the user interface.
Table.Profile provides key statistics about our data.
Click on the fx icon next to the formula bar and enter the following.
=Table.Profile(Source)
Source is the name of the previous step.

This function shows the key information about our data.
We haven’t set any data types yet; therefore, min, max, average, etc. cannot be calculated and return null. However, for our purpose, we are interested in the Count and NullCount columns.
If the NullCount is equal to the Count, then we know that column contains only blank rows.
You can find out more about Table.Profile in this article on Power Query.
List the blank columns
We want to get a list of the blank columns.
The NullCount column currently shows abc123 as the data type. To ensure the calculation works correctly, we must first change this to a number data type. So, apply a decimal number data type to this column.
Next, we want to filter where Count is equal to NullCount. Unfortunately, we can’t achieve this directly in the user interface.
Filter the Count column to any value. Then, amend the M code in the formula bar so it shows the following:
= Table.SelectRows(#"Changed Type", each ([Count] = [NullCount]))
#"Changed Type" is the name of the previous step.
Also, if we add [Column] to the end of the formula, it returns only the list of values from the Column column.
The formula bar should show the following:
= Table.SelectRows(#"Changed Type", each ([Count] = [NullCount]))[Column]

This is the list of blank columns we want to remove.
Remove the blank columns
Now let’s use the Table.RemoveColumns function to remove the null columns.
Click the fx icon next to the formula bar and enter the following:
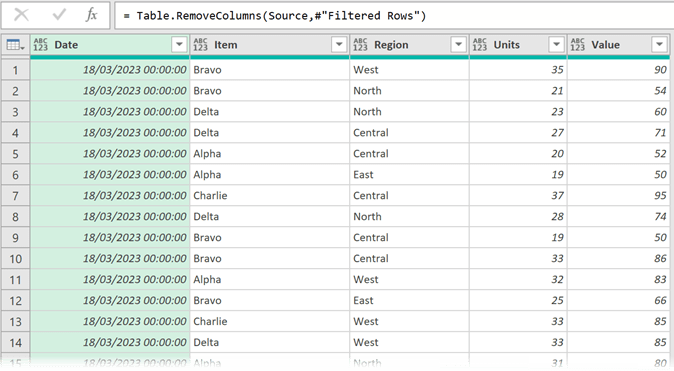
= Table.RemoveColumns(Source,#"Filtered Rows")
- Source is the name of the step which contains the original table
- #"Filtered Rows" is the name of the previous step which contains the list of null columns
And that is it. The null columns are removed.

We can now continue with the other transformations we wish to apply.
Conclusion
In this post, we have seen how to remove null columns in Power Query.
As we did not explicitly reference any column names, even if new null columns are added to the source, these steps will continue to refresh correctly.
Archive and Knowledge Base
This archive of Excel Community content from the ION platform will allow you to read the content of the articles but the functionality on the pages is limited. The ION search box, tags and navigation buttons on the archived pages will not work. Pages will load more slowly than a live website. You may be able to follow links to other articles but if this does not work, please return to the archive search. You can also search our Knowledge Base for access to all articles, new and archived, organised by topic.
