
In Tip #492 I demonstrated how to add a custom ribbon to your workbook. In this article I am going to give an example of a ribbon set up with a few of the button types I use most often, which you can take and modify. The other element I use on a frequent basis is the combobox which deserves its own article so will be covered in part 3.
You may wonder why you want to put buttons in the ribbon when you can use form controls, covered in Tip #408, to put them on the face of a worksheet. For me it’s all about the cognitive cost of switching between worksheets when operating a model, which even has a fancy name – attention residue. I have previously used Excel workbooks with a control sheet containing buttons on it to control all of the macros within the Workbook. However, I find that once I navigate to a control sheet, I can forget what I’m trying to do, and it can take me a few minutes to get my train of thought back – not ideal if I’m working to a tight deadline! Whereas the ribbon is always available, whichever Worksheet I’m currently viewing (and as someone with minimalist tendencies I also like that fact it doesn’t clutter up my Worksheets with buttons).
To keep it simple, the example VBA code that I have included in this article will just display a message, but you can replace my simple macros with more useful ones for you. For example, in my Workbooks I might have macros to:
- import data from other sources;
- run a goal seek;
- set inputs back to default values (or clear them entirely); or
- run different scenarios and paste the outputs (as described in Tip #166)
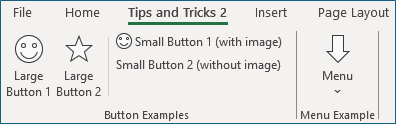
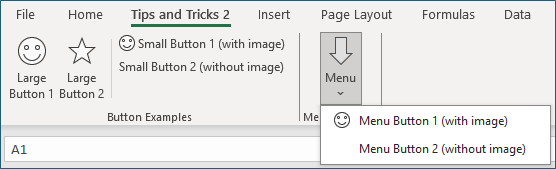
Overview of the example ribbon:
If you follow the steps in the previous article but replace the VBA code in step 2 and the XML in step 3 with the following code, then you will create a ribbon that looks like this:
Replacemenrt code
VBA
Public ribRibbon As IRibbonUISub prcRibbonOnLoad(ribbon As IRibbonUI)
Set ribRibbon = ribbon
End Sub
'Callback for btnLargeButton1 onAction
Sub prcLargeButton1(control As IRibbonControl)
MsgBox "Large Button 1"
End Sub
'Callback for btnLargeButton2 onAction
Sub prcLargeButton2(control As IRibbonControl)
MsgBox "Large Button 2"
End Sub
'Callback for btnSmallButton1 onAction
Sub prcSmallButton1(control As IRibbonControl)
MsgBox "Small Button 1"
End Sub
'Callback for btnSmallButton2 onAction
Sub prcSmallButton2(control As IRibbonControl)
MsgBox "Small Button 2"
End Sub
'Callback for btnMenuButton1 onAction
Sub prcMenuButton1(control As IRibbonControl)
MsgBox "Menu Button 1"
End Sub
'Callback for btnMenuButton2 onAction
Sub prcMenuButton2(control As IRibbonControl)
MsgBox "Menu Button 2"
End Sub
XML
Colours have been added to the xml code sample below for clarity but only the text itself is important.
<ribbon>
<tabs;>
<tab id="customTab" label="Tips and Tricks 2" insertAfterMso="TabHome">
<group id="gpButtons" label="Button Examples">
<button id="btnLargeButton1" onAction="prcLargeButton1" size="large" imageMso="ShapeSmileyFace" label="Large Button 1" />
<button id="btnLargeButton2" onAction="prcLargeButton2" size="large" imageMso="ShapeStar" label="Large Button 2" />
<separator id="sep1" />
<button id="btnSmallButton1" onAction="prcSmallButton1" imageMso="ShapeSmileyFace" label="Small Button 1 (with image)" />
<button id="btnSmallButton2" onAction="prcSmallButton2" label="Small Button 2 (without image)" />
</group>
<group id="gpMenus" label="Menu Example">
<menu id="mnuRefresh" label="Menu" size="large" imageMso="ShapeDownArrow">
<button id="btnMenuButton1" onAction="prcMenuButton1" imageMso="ShapeSmileyFace" label="Menu Button 1 (with image)" />
<button id="btnMenuButton2" onAction="prcMenuButton2" label="Menu Button 2 (without image)" />
</menu>
</group>
</tab>
</tabs>
</ribbon>
</customUI>
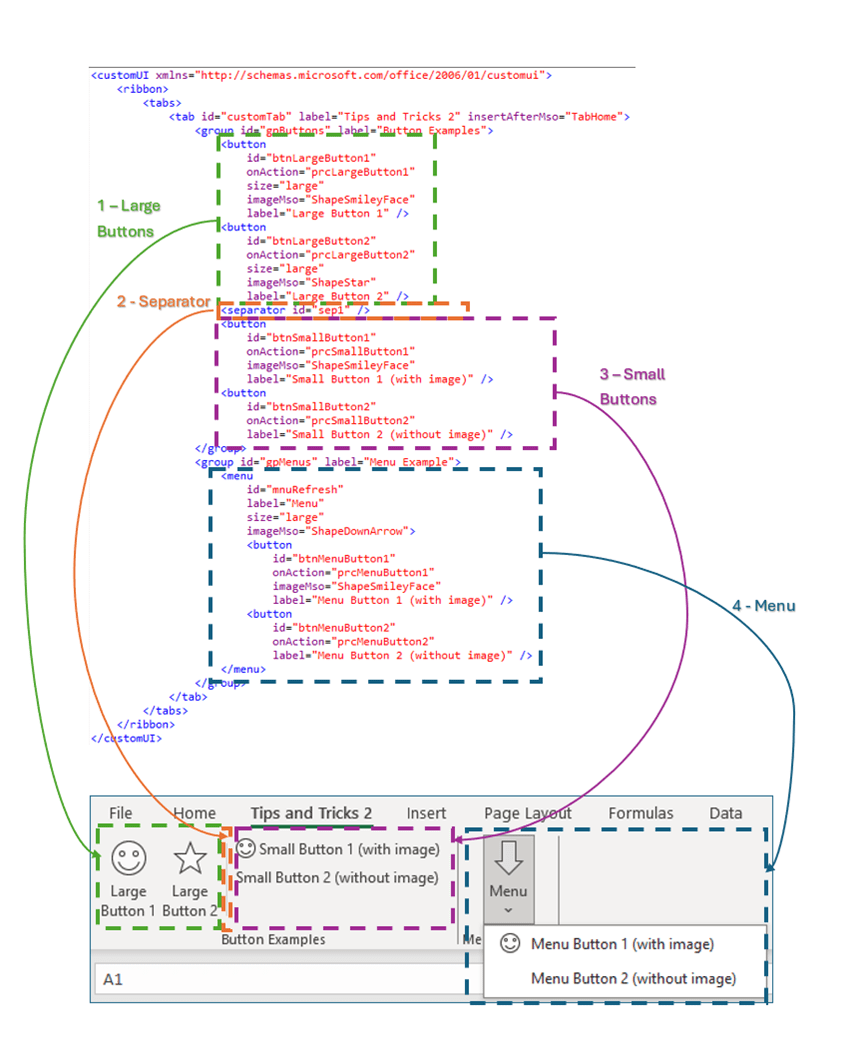
Groups
Each group in the ribbon starts with a “<group … >” tag and ends with a “</group>” tag. If you want to add another group to the ribbon, then just add a new start and end tag before or after another group. If you want to remove a group, then just delete everything starting with the group start tag and ending with the group end tag.
The groups in my example have a label attribute which contains the text shown at the bottom of each group, and an id attribute which needs to be unique to that group.
Buttons
If you want to add another button then just copy one of the existing ones in the xml code, making sure to include everything from “<button” to “/>”, and paste it into the group that you want it to appear in, between the start and the end tag. If you want to delete a button, then delete everything from “<button” to “/>”.
Buttons in the example include the following common attributes:
- id: This must be unique to each button.
- onAction: The VBA macro you want to run when you press the button and must match the name in the VBA code.
- label: The text that appears on the button.
- imageMso: The image on the button. As mentioned in the previous article, if you search the internet for ‘imageMso’ then you’ll find lists of all the images that Excel will recognise by default.
1 – Large Buttons:
This is the same type of button demonstrated in the previous article. To specify a large button, you need to set the size attribute to large.
2 – Separator:
The separator allows you to split a group in the ribbon into different sections. As with buttons and groups, the id must be unique.
3 – Small Buttons:
These are specified in the same way as large buttons but with the size attribute omitted. The example provided shows what this looks like with and without the imageMso attribute specified.
4 – Menu Buttons:
These are set up in the same way as small buttons but placed inside a menu element as well as a group. The menu element has similar attributes to the button element.
If you develop workbooks with their own ribbons is there another element that you find yourself using frequently? Let me know by sending an email to the Excel community email address (excel@icaew.com) – I’m always keen to learn about other useful features.
Archive and Knowledge Base
This archive of Excel Community content from the ION platform will allow you to read the content of the articles but the functionality on the pages is limited. The ION search box, tags and navigation buttons on the archived pages will not work. Pages will load more slowly than a live website. You may be able to follow links to other articles but if this does not work, please return to the archive search. You can also search our Knowledge Base for access to all articles, new and archived, organised by topic.
